Embossing leather with plugs
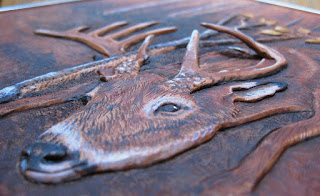
 There are many ways to emboss (raising from behind) leather images. Because I use a cut and lift style on the surface for most works on paintings, the plugs used are made from 1.5 to 2 oz. leather stacked and shaped for the desired effect under 6 oz. leather for the primary working surface. This way a plug can be lifted with the top surface when it's cut for extra strength and stability especially on thin parts like the antlers on this deer. Note that during the transfer process I also started some of the modeling. Only the head and right side antler (from your view) will be embossed on this picture. After cutting the work and doing the basic beveling of the subject, in this case the head and antlers, make a tracing, or faster and more efficient a photocopy of the leather surface to use in making the plugs.
 | ||
| This is the actual photocopy of the leather |
There are 2 plugs under this picture. I stack the plugs and glue them to each other before inserting them behind the leather so make sure the positioning is accurate. Lay the finished plug on top of the antler and head to make sure there is enough room to wrap the top leather around the plug with bevelers after insertion. On larger pictures I also edge bevel the plugs for better shape and contours when wrapping.
Here is the image with a raised right (to you) antler and plugs properly placed in the head. The foreshortening used on the body makes the head of this big buck dominate the scene as was intended and the color enhances the effect beautifully in the next photo.
Enjoy! visit silvafoxartistry.com and see my work on Linked-In, Facebook, Instagram


Comments
Post a Comment