Posts

Creating a Special Pet Portrait - Part 2

Image
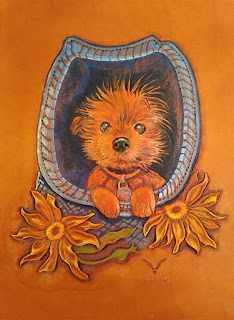
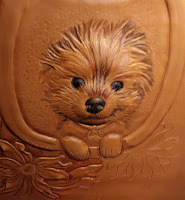
In part 1, the bag color had just started with blue shades enhancing the grisaille or purple shadows. The building of the blue over the shadows is pushing the dog further into the forefront and she looks almost ready to hop out. Note that I do not paint evenly on the bag behind the head. The closer the brush strokes come to the animal the darker I want it so that the pup stands out more. Outlining the cut edges of the design also pulls the carving forward. The right side of the bag is too light and will be toned down. A little more yellow is brushed on the flowers. Have you noticed that the purple has all but disappeared and each segment of the design still has shading?😀 I have also added some highlights to the pup's nose and eyes using the pale blue shade. I almost never use pure black or white on my paintings. Now I've introduced shades of brown; umber and sienna, to the fur, eyes and flowers in washes.  To that very small amounts of titanium white are added to individual h
Image
  Creating: A Special Pet Portrait For many people pets become a very special part of their lives so I always look to capture a unique characteristic that is special for the individual. In this case the lady always carried her little dog in a cloth handbag.    In this design in progress, the pup is framed by and looking out of the handbag. Because the fabric will be blue I chose yellow cone flowers to accent the composition and complement the color of the bag. On this extreme embossed figure gave a base color to the eyes and nose to give a sense of realism. The seeming grin on her face is because she is a very old dog and has lost the top canine tooth on the left side. Her tongue would stick out but I allowed the dignity of a precious face without too many details. Beginning the color using a Grisaille (French: Gris means Gray) painting style I add shading to the image. But it's purple!!😧 not gray . Yes, I developed this technique when painting on leather long ago because the tan

What is ART?

Image
There are many flowery descriptions and thoughts on ART and what art is. Some say it's in the medium-- oil paint on canvas, bronze, marble; those are the choices of museums and galleries. Before I go to actual definitions and thoughts, I refer only to visual art here, not music or theater or "art of" things like language or cooking or wine or ___ fill in the blank. Briefly, in the Oxford dictionary, pocket version, ART is defined: 1 the expression of creative skill in a visual form such as painting or sculpture. 2 paintings, drawings and sculpture as a whole. Now that description seems simple and straight forward to me. I've been working with leather for many years, created, taught and published my own unique ways of manipulating the medium and introduced easier ways of working with color on leather. I've sculpted, designed, shaped, stitched, manipulated, assembled, cut, pounded, boiled, stretched, you get the idea...I know a lot about working with leather. Lea

Learning and Reinventing Wheels

Image
silva fox artistry For the Leather Artisans: I've been an artist all my life and have found that just when I discover something new, a product, style or technique, someone else has found it too! So you don't feel as let down as I do when this kind of thing happens I'm giving a heads up on things I want to share. Most will have to do with my number one passion--ART, more specifically LEATHER ART , and even MORE specifically Wildlife, Tame life and Flora which I have been doing for quite a while. I don't do basket weave because I can't manage a straight line and I don't make; gloves, saddles (though I did make one for my grandson's rocking horse), boots, pants, utility belts, etc. My expertise lies in creating ART that is life-like in tooling leather so I will share those techniques. I hate wasting time on preparations for carving leather, there are efficient ways of doing things and a way of creating exciting patterns when you can't draw anyth

Transferring a Pattern

Image
Some years ago, because my leather dried too quickly, I needed to figure out an option to maintain a working moisture content in the leather for longer. If leather is wet and allowed to dry too often it becomes harder, literally tougher to cut and tool. Because of this I decided to try covering the leather with plastic to retain the moisture. After trying several kinds of plastic, I settled on cling wrap, any brand. Because it is so thin and strong I can case the leather, cover it with the plastic and when it's ready for transferring a design, put the paper pattern right on top and trace away. My pattern doesn't fall apart because of the moisture and the lines remain crisp and clean. I can feel an indentation on the paper with my finger where the tracing is already done or lift and look if necessary. Tracing film works well but because of the thickness the lines transferred tend to be wide and blur when put close together. Another little time saver is to use a modeler right ove

Designing patterns

Image
Patterns can be easily designed from photo's you've taken then using a copy machine to size and piece each design element. Using a black, fine point marker, trace each piece for your design carefully eliminating any part of the photo you don't want. Set the copier to a lighter setting to get rid of distractions in the pattern. Your black traced lines will show up clearly. Use the marks you are familiar with on a leather pattern ie. solid lines for cutting, dashed lines for details not cut, and feel free to add contours like muscle structure and I'll show you how to make your modeling a bit easier. Make copies of the sizes you want these design elements to be when they are assembled. Piece your picture together as you like and tape the parts down. Copy the work one more time as one piece and voila, you have an excellent pattern! I can draw, but this kind of an assembly makes designing a custom pattern a bit easier for people who don't draw well. (Make s

Embossing leather with plugs

Image
There are many ways to emboss (raising from behind) leather images. Because I use a cut and lift style on the surface for most works on paintings, the plugs used are made from 1.5 to 2 oz. leather stacked and shaped for the desired effect under 6 oz. leather for the primary working surface. This way a plug can be lifted with the top surface when it's cut for extra strength and stability especially on thin parts like the antlers on this deer. Note that during the transfer process I also started some of the modeling. Only the head and right side antler (from your view) will be embossed on this picture. After cutting the work and doing the basic beveling of the subject, in this case the head and antlers, make a tracing, or faster and more efficient a photocopy of the leather surface to use in making the plugs. This is the actual photocopy of the leather When a plug pattern is made from the original tracing pattern you might not be compensating for a cut made heavier or thinner t